It's hot here! Way too hot, if it's going to be this hot we might as well be in Arizona where there is air conditioning and swimming pools. So to keep ourselves cool Huds and I head in doors for the afternoons, which has been harder on Hudson than on me. Being inside has enabled me to slowly plug away at some of the projects I have been wanting to do, like hang things in the bathroom! and touching up paint :( and ironing :(, meanwhile H is looking the basketball hoop on the smoldering asphalt wondering why we aren't out there playing...
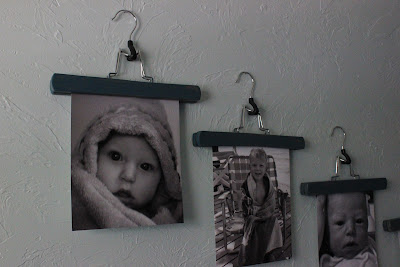
Anyway, I had been wanting to finish the guest bathroom and as a new one family income, I had to get creative on what to do. It is a large wall and I had a budget of $25. Here is what I came up with -
I saw this photo idea on Pinterest. So cute and I love that it doesn't feel like such a big commitment, I can quickly and easily change the photos when I get bored (which we know happens often!)
Can you tell which one is Colin?
Homemade fabric bulletin board. Fun to make, fun to look at!
So how did I do sticking to budget? Not bad at all, I went over a little bit, but have left over fabric and cork board that will be used in the next project!Hangers - $4 for 4
Paint - free, left over from another project
Picture enlargements $3.99 x 4
Frame - $1 at garage sale
Cork Board - $6.99 a yard (I have enough left for another project!)
Fabric - $9.99 a yard (Lots left over as well)
Grand total - $37.00
DIY Fabric Covered Bulletin Board -
This was a really easy project, I was able to it all, while watching (well sort of) a movie with Colin.
1. Measure the inside insert of your frame, where the glass would normally go. If your frame still has glass, you can just trace the glass onto your cork board.
If your frame has glass, it would be easiest to get cork board the same thickness as the glass, that way you can just insert your board instead of the glass and use the frames already existing backing.
2. Cut your cork board to fit into the opening. I cut on the inside of the lines I traced to leave room for the fabric to wrap around the board. My frame didn't have glass or a back so I had more flexibility.
3. Cut your fabric a 3/4 larger than your cork board on all sides (so it can wrap around the board).
4. Lay your fabric on the floor and your cork board on top of it, starting at the top, fold the fabric over and glue to cork board with hot glue gun.
5. Insert your new bulletin board into the frame. If you want it to be a little more sturdy, you can glue cork board into the frame as well.
6. Hang. Depending on what kind of shape your frame is in you can use the hardware from the frame to hang it on the wall.
Hangers
1. Paint your hangers a fun color- I didn't sand or prime just painted right over. I am sure you could and it might be better but this worked just fine for me.


2 comments:
I love those pictures!! Such a good idea Emma. I need to get out there to see you HOUSE!!!!! man oh man.
Thanks Nat!!! We would love love love you to come out! Maybe you could do a special research project on Western weddings for work...
Post a Comment