Wednesday, March 21, 2012

Oh sweet SPRING!


Spring is official here and we couldn't be happier.  To celebrate we made some spring-time animal crackers. Well, that was the intention but as soon as Hudson saw the bus and horse cookie cutter that is what we were making. 

He was not as helpful as I was hoping he would be, he preferred to eat the dough (where did he get that from?)

 And to play with the dough...
 Or smash it.
Fortunately, he got bored quick and realized we couldn't have cookies without tea. So while he made the tea I finished up.
 Butterfiles! Now that is spring!
These might be a little more like cookies than crackers, but they are delish, light yet rich, but pretty fragile so not for snacking on the go, unless you are ok with crumbs. Here is the recipe, I adapted it from here, made it gluten free and a little lighter.

11/4 cup gluten free flour
1/2 cup shredded unsweetened coconut (you may need to warm yours up a bit, if your house is cold)
1/4 cup extra-virgin coconut oil
1/3 cup honey
1 egg lightly beaten
1/4 teaspoon salt


Beat honey, coconut oil, salt and egg until well incorporated. Add shredded coconut and flour mix until just incorporated, then need dough a few times on your counter until it a workable consistency. Divide into two, roll, and start cutting.  Eat dough. It is awesome. Bake at 350 for 7-8 minutes, until dough is just beginning to change color.


They are definitely better tasting and easier to work with when they are thicker, 1/4 inch-ish. And they brown really quick in the last minutes of cooking, so watch them!

ENJOY! HAPPY SPRING!

Saturday, March 17, 2012

Sparks Fly!

So 2 months after Emily's birthday, I finally finished her prototype spark (norwegian for kicksled)!


I happend to snag a perfect chair at restore for $5.


Then, I added customized metal skis. 3/8 steel, I believe, bent at a guestimated curvature, with a few hardware platforms added for connecting skis to wood.  Our friend J.T. at Iron Mountain Anvil customized the skis. What a talented guy, check out his work here, Iron Mountain Anvil .


A nice straight box-elder or green ash?  I'm not sure, clipped it a few years back and thought I'd better keep it since it was so straight.  Now its the handle (bark for grip) and footrest for the spark with some nifty hardware inserted for serious strength.


A couple of past-their-prime hockey sticks and some cabinet plywood completed this prototype spark.

We took it up to S. Fork of Piney Crk trail to test it out today.  Probably would have been ideal about 2 weeks ago, as we had a couple of bare-earth spots resulting from the 60-degree temps this week.
That said, we found plenty of trail to spark on, and the consistency was pretty perfect - hard-packed end of season snow.  We rigged up a bungee cord to Hudson's lawn chair (thankfully, there is no word in Norwegian that means "redneck") and the rope was an additional safety precaution.  Next time we'll maybe take a long a helmet?


Took a few notes on design and will likely make a couple of minor adjustments before painting and calling it complete.  First will be to give the passenger a more level area for their butt, right now is angled slightly forward.  Other will be to chop about 1.5' off the end of the skis, don't really need all that metal wobbling off the back.

A few more pics and video.


This is really going to be a great way to get out and about town, once Sheridan has hard-packed streets this next winter.  I'll have to get a harness ordered for Luna too as she would have helped with the uphill today!

Pretty basic to build, spent under $120 for supplies (all wood was on-hand) and there were a few different designs online that were used to assemble spark/kick sled.  If anyone is ever interested I can get you the measurements and details.

Thursday, March 15, 2012

5 minute DIY I-phone cover


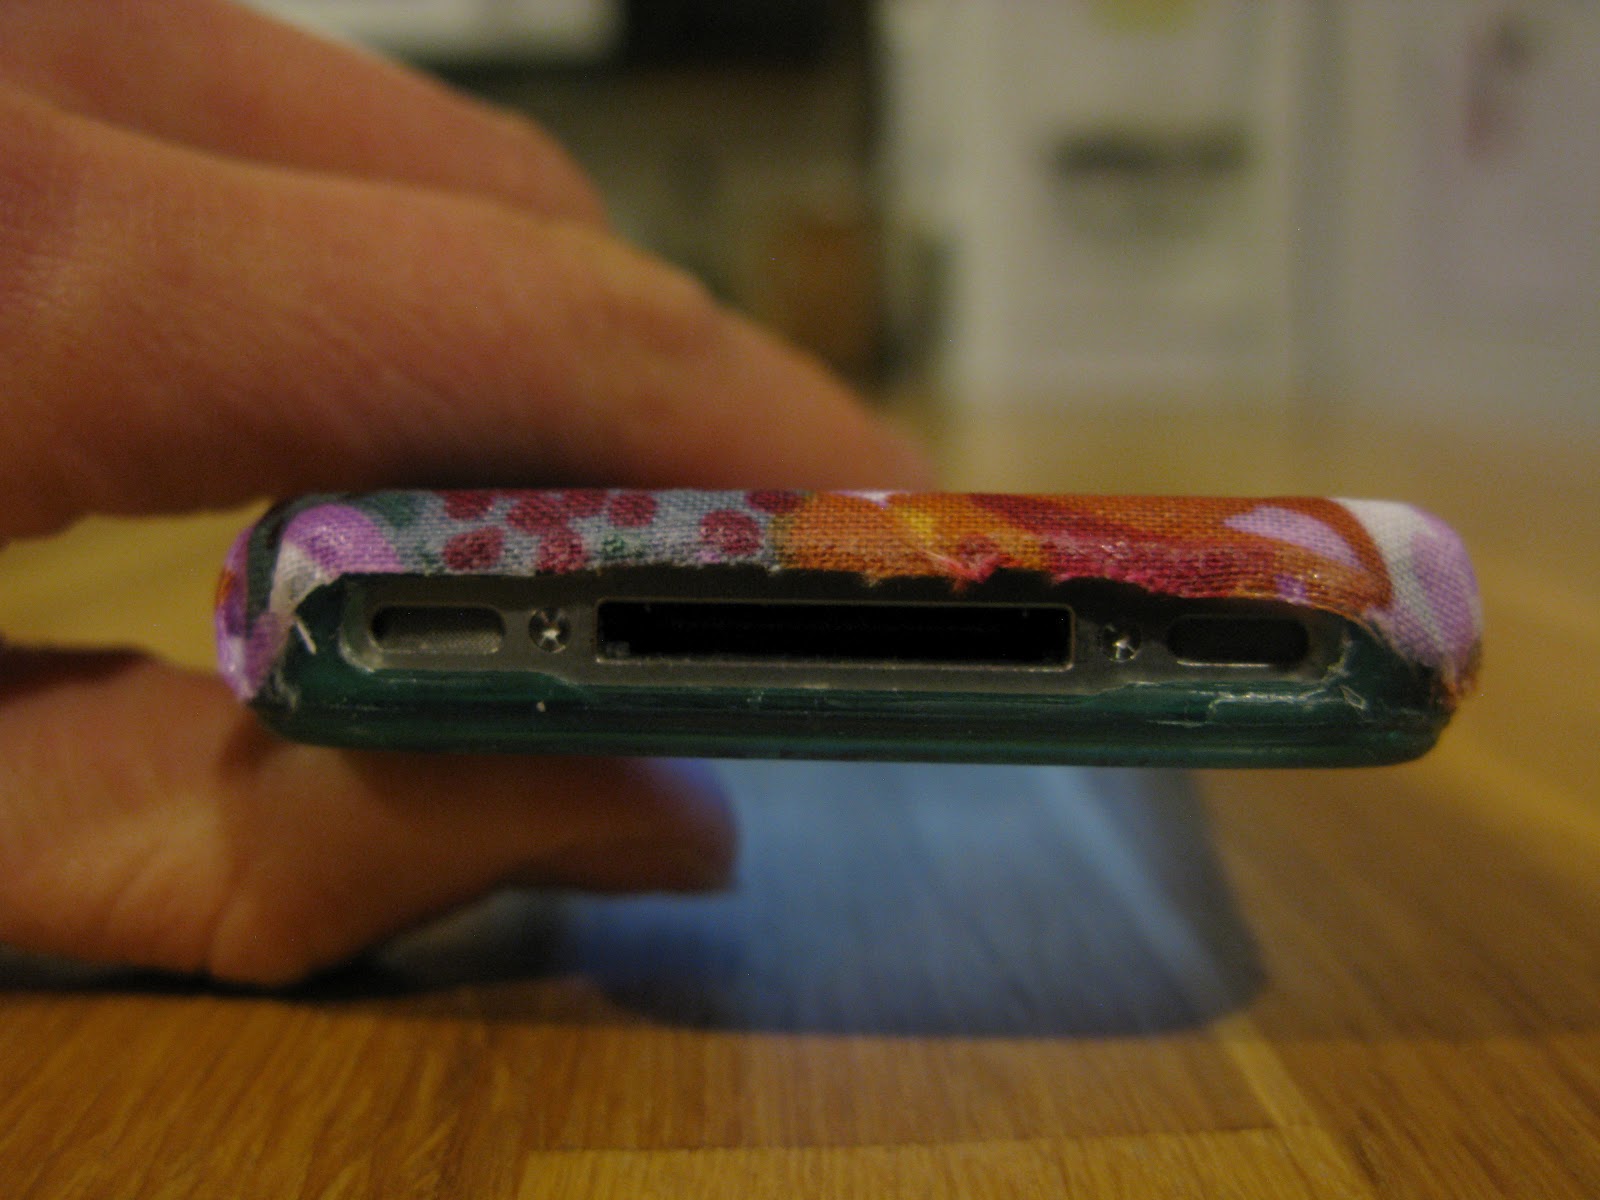
Who has a free but bulky, sort of ugly i-phone cover, that they don't really like? AND who really likes the sleekness, the feel, and ease of use of the I-phone without a cover? ME!! So much so, that I opted out of using my free cover and deciding to live on the edge; going without a cover.  I did, however,  purchase an "invisible steel" screen cover...turns out invisible steel is not as strong as it sounds.  Without going in to the borrowing details, I decided it was time to cuten-up my old cover.  It took seriously 5 minutes and I am pretty happy with the results-

Make an outline of your case on pretty fabric. Decide if you want just the top (this might be a lot easier), or if you want to wrap around to the inside of the case, measure accordingly). If you are wrapping around trace the wholes on the sides on to the fabric as well.

Cut out the fabric with good sharp fabric scissors, cut really straight lines, and try not to fray the fabric.  ModPodge your fabric on to the phone cover. First put the ModPodge onto the case align your fabric and then cover fabric in ModPodge. Let dry.

As you can see, mine is by no means perfect.  You perfectionists out there (Meg) will want to take more time to measure perfectly and even sew your sides and holes.  But if are like me and have 5 minutes, and  want to make your case a little prettier, so you are not as sad when you look at the other side, do this!


As you can tell me lines aren't perfect.


It was late and I was tired so I decided to just cut this side off instead of cutting the circle out. 


Quick GO! Make your cover cute before your phone looks like mine does! 

Saturday, March 10, 2012

What a day

An early morning run, a warm sunny day, a sleeping son, a cup of coffee made by the one i love, and a little quiet time.  Does it get any better than this????


Here's to a great day!

Sunday, March 04, 2012

A place at the table...

Lent is here, which means Easter is almost here, which means Spring is almost here! YAY, yay, yay. Yay Easter, yay spring, yay new life, yay green growth, yay melting snow, yay warm sunshine on my face!!!!

This year for lent we decided to try something different and it has been awesome. I wouldn't normally share what we have been or haven't been doing for lent but I really want to because it has already been such a great experience.  I especially want to encourage anyone who hasn't given something up or doesn't have a lent focus yet, give this or something along the lines of this a try.  Inspired by the book, A Place at the Table, by Chris Seay, we have been fasting a following a diet similar to the diet of the children we sponsor through World Vision.  The book is nothing crazy, earth shattering or any we haven't read before, but the act of being obedient, willing to change our habits and norms has been.

You can check out his website here chrisseay.net/ if you want more info.

I have fasted before but so far this has been completely different, so much better.  I think mainly because it is not about me or my needs or wants or my small world.  But it is about seeing and better understanding the realities of the world and my very fortunate place in it.  And WOW! I take so much for granted, from the ability to choose between 10 different breakfast items and 35 different snacks, to a warm (and large!) house, the opportunity to work and learn and be free to make choices about everything from the food I will eat to the type of life I will have, but most importantly having a safe and healthy family. The last weeks have been a great lesson in gratitude and awareness, I have been blown away by our blessings and even more blown away by our surplus. We are blessed beyond measure.

So we have been faced with the question of "what are we called to do with our surplus?"

Following historic lent traditions (according to the book), we should take the first 6 days of the week to fast and identify with the poor but we get the 7th day off!!  It should be a day to relax and celebrate the love of our savior and our many blessings.  So today was feast day!  When Lent started, we joked about feast day and how much we were going to look forward to it and how Colin was going to make up for all the lost calories over the week, so he didn't lose any weight.  Although the food was great today, by far the best part of the day was the heightened awareness that we are blessed indeed.  The luxury of delicious food brought to us from all across the world, time with friends-new and old- breath-taking views of where we call home, and clean water.   And while all of these luxuries were amazing, the richest part of our day was the hours we spent recreating outside with Hudson and his little friends...they truly know how to be thankful for each moment of the day. WHAT a DAY! 

Monday, February 27, 2012

The ACKLINS take Manhattan...

Well, not all of the Acklins, just Natalie, but she is representing all of us and she is rocking it!  She moved to New York several months ago and started working for BRIDES magazine in January.  If you turn to page 56 you will find her name, right there, in print.  Woohoo!!! 


 NannyKate, so proud of you!  


Now I have an excuse to buy bride magazine every month! Love it. You can never get enough wedding fun... just need a sister or friend to get married so I can put it all to use.


This is a view looking up at Natalie's office, the second tall building on the left.

The view I have from work. Oh, what different lives we have! 

And no post would be complete without a little Hudson lovin'!

Sunday, February 19, 2012

Let there be light!


Canning jars from your in-laws attic = free
Cool old wood = free
Chain and wiring from HD = $7
Light bulbs = $5
A husband who willingly & patiently works to makes all your ideas come to life  = PRICELESS!

Thanks to Colin my amazing handyman/electrician husband we now have diningroom lights!  I had seen these fun canning jar lights on Anthropolgie months ago and thought they would be super easy and fun to make (well, have Colin make).  I showed him, I think he was skeptical at first, but then he found these antique-ish canning jars in his parents attic this summer, and, well, we all know how Colin loves anything FREE, so he was on board! Once we actually sat down to do make them it was super quick and easy, we used some cool old wood we had laying around, bought chain, wiring, and light bulbs and put it all together (there might have been a little more to it than that but Colin will have to explain those details!). I think they turned out really fun!


This isn't the best picture of the lights but I had to include it because look at Hudson!!! So darn cute just  sitting there, hanging out, eating his oatmeal like 3 year old or something!


Monday, February 13, 2012

DIY picture frame window

Sooooo we still haven't made much headway on the window seat (so much for that January goal!) but we did frame in the windows and I LOVE them!  They are well worth all my hesitating and debating!  I knew I wanted something different and I had a vision of what I wanted "a picture frame window" but I had never seen quite what I wanted before and I wasn't exactly sure how it would turn out (I have a lot of visions and they don't always translate well into reality!).  Originally, I want to find and use old picture frames, however, I realized that living in a small town and in winter (i.e. no garage sales) finding enough cool old frames was going to be near impossible.  That combined with the fact that every now and then, I get in a bit of a dither and have to finish something right NOW!  Fortunately,  Homedepot has everything and I found exactly what I was looking for in the molding section, it's technically not window trim, it's a chair rail, but it worked perfectly. 

Trim - House of Fara 8 ft. Basswood Chair Rail 

Paint - Martha Steward Plumage

TOOLS -
Paint
Trim, chair rail, or whatever material you are using (*make sure you measure enough to cute the angle on the corners, if your trim is 2 in. thick you need to add 2 in. to each length for the cuts. I learned this the hard way)
Chop saw
Caulk
Finish nails
Brad nailer
Spackling - to fill the nail holes if you are looking for perfectiont
A very handy Grandpa and a super cute assistant

 Does it get any cuter than this?!

 Hudson adores his Grandpa, he is not nearly as compliant or interested when mom is working on projects. 

The finished product!

Our windows are inset into the walls,  so I painted the inside drywall trim to match the picture frame trim.


Thanks for the help, mom, dad, Colin and of course, Hudson!  Now I just need to get cracking on the window seat and we will have a finished room!


Step 1- Measure all four sides of your window. Hopefully, they are close in length, if you want all your angles to be perfect, pick the shortest length and cut all four sides to this length.
Step 2 - Use a chop saw to cut your trim at a 45 degree angle.
Step 3 - Paint your wood.
Step 4 - Use your brad nailer to nail to wall
Step 5 - Caulk the areas your trim touches the wall or where you want a smooth surface.
Step 6 - Spackle your nail holes and touch up the paint


Sunday, February 12, 2012

Ringing in 30 with a kick in the eye :(


Last Saturday was Colin's 30th Birthday, I had plans for a special, adventurous,  yet low-key and  memorable Birthday celebration (exactly what Colin would want, I know right? no party? no huge cake, no big celebration?!).

Hudson had different plans, he thought they should wrestle, he gets rowdy when they wrestle, he doesn't know his own strength, or perhaps, more accurately, he hasn't master his strength or sporadic body movements and he is sort of spastic like his mama.  Needless to say, somehow in all the rolling around, he kicked Colin in the cornea.  Yes, the actual cornea, not just the eye, the cornea, and yes colin has a history with his cornea...remember this???!

Anyway, the kick resulted in an abrasion to the cornea, light sensitivity, pain, and an abrupt end to the Birthday fun :(

The day started out just as I had planned with an amazing breakfast (not in bed because that's messy and potential sticky) with fruit, fresh juice and perhaps the worlds best caramel rolls, thanks to the helping hands of Sharlyn Peterson, Hudson's surrogate Grandmother and baker extraordinaire.
Thanks Sharlyn, they were quite possibly the only successful part of the day.  Since Colin didn't want a big celebration for his birthday and since we live so far away from many of our dearest and closest friends.  I thought we should celebrate in different way so I asked our family and friends to send notes, stories, antidotes, memories and/or pictures of Colin.  I hid them through out the house for a Birthday surprise, unfortunately due to his injury he was not able to find or read the majority or the messages. (p.s. if I missed asking any of you I am so sorry! I was not the best sleuth at secretly getting all Colin's friends emails and I had a lot return undeliverable :(


He was able to read a few notes before the injury. This one from his old buddy, Tyler Hartanov, included pictures. It was hilarious, I laughed out loud when I read it but as you can tell from the photo Hudson is not laughing and I think I detect a hint of embarrassment.  I didn't get pictures of the rest of the notes, I think I took the kick to the eye the hardest in the family and was super frustrated with "my" Birthday plans begin ruined and didn't roll with the punches very well.  Obviously, he wasn't able to read the notes or really enjoy them that day but he did over the next few days and he LOVED, LOVED, LOVED them!! THANK YOU so much to everyone who participated.

Hudson didn't quite understand what was wrong with his dad, he kept bringing him his shoes and books and toys and trying to play with him.  He even brought him his presents to open and then proceeded to open them for him.

 Hudson finally gave in and resigned to napping with dad.  If that doesn't melt your heart I don't know what will. 

Wednesday, February 01, 2012

Raw Bok Choy Salad (and vegan and gluten free too!)

This recipe is so good, I just had to share!  

We order bountiful baskets almost weekly (if I remember to order and pick it up!).  If you don't know what bountiful baskets is check it out, it is awesome http://bountifulbaskets.org/  I must have been a little trigger happy when I was ordering last week because I ordered an absurd amount of produce.  I have been trying to find ways to eat all this goodness before it goes bad.  In addition to the regular basket, I also ordered the asian bag, which included lots of exotic goodies that I have no idea what to do with.  

I remember my mom making a bok choy salad when I was growing up so I thought I would try something along those lines.  After looking at the recipes, I realized they were not quite my style anymore...sorry ramon noodles, you were awesome in college but I just couldn't do that to my beautiful greens.  Here is a raw, vegan, gluten free, super tasty version of the salad.  I recommend it with grilled salmon (ops not vegan  anymore)  and adding soy beans to the left overs for lunch!

Ingredients:
    1/4 cup olive oil
    1/4 cup white vinegar
     3 tbls. agave nectar (or brown sugar)
     3 tbls. Braggs Liquid Amino Acids or soy sauce
     1 tbls. Sesame oil
           
      1/2 bunch bok choy, chopped
      1/2 asian cabbage
      1-2 cups shredded carrots
      ½ cup snow peas, chopped
      4-5 green onions, chopped
      1/4 cp sesame seeds
           
1.              Mix together oils, white vinegar, agave/sugar, and braggs/soy sauce.
2.              Combine all ingredients, toss with dressing, and eat. 

*Connoisseur Colin thought adding candied almonds would make the dish. I am sure you can make with whatever veggies you have on hand and in different proportions.  


Enjoy!!!!

Sunday, January 29, 2012

A new shade of things

Well, we had our real first causualty with Hudson last week.   Somehow he got a hold of one of our living room lamps and broke it. He is 16 months now and has been cruising around for quite a while, so I am not complaining and actually I am rather shocked that something hadn't broken sooner, he is after all my child!!! It was a beautiful blue/turquoise lamp that I loved. But it was just a lamp that I got at TJmax, nothing too special and really not a big deal. But to be honest, I was a little disappointed because it was a really CUTE  lamp and it was PERFECT in the room and I thought where will I ever find another lamp that is that perfect and that price?????

The reality is I probably wouldn't, so I had to take things into my own hands and here is what I came up with, with the help of my lovely mother!!! It is 100 times better than what I had before. :) :) :)  AND what a great life lesson! You can get all worked up and cry over a spilt lamp or you can go to the thrift store, find a sweet lamp, throw in some beautiful fabric that you have been dying to use and get creative.  Taking something broken and making something new, beautiful, and one of a kind. I love it!!


There are several DIY tutorials for how to cover a lamp shade but they weren't very descriptive or complete so here is our tutorial, complete with our lessons learned.

Tools -
   Scissors
   Spray adhesive, we used High strength 90 and this was probably too strong
   Craft brush and craft glue
   Fabric and a cool old lamp

STEP 1 - Make a template - This step is important and will help you in the end.
Trace your lamp shade on to a large sheet of paper, newspaper, butcher paper, or whatever you have. Place the lamp on one end of the paper on its side, starting with the seam, trace the outline of the lampshade as you roll it across the paper. Then decide how much fabric you want/need to fold over the top and bottom of the lampshade, anywhere between 1/4 in - 1 in. is probably right. Add this amount to the top and bottom of your template. ***The more exact you are here the better! You don't want to have to trim the fabric or have it uneven on the inside because you do see the inside of the lamp shade depending on where you are in a room. 

STEP 2 - Cutting - Cut out your template and then trace it onto your fabric. Cut your fabric.


STEP 3 - Set your self up for success :) - Use clothes pins to place your fabric on your lamp shade and see that everything aligns how you want it to. (You can also do this with your template before you cut your fabric to double check your measurements)


STEP 4 - Prep  - Spray glue is crazy, sticky, gooey stuff, so we protected our lamp with a plastic bag and probably should have protected the surrounding area a little better.  PRACTICE spraying the glue before you start on your shade, so you know how much pressure  to apply and how it sprays.


STEP 5 - Gluing  - We found it was easier to work with the shade on the lamp, and to go in small sections about 4 inches at a time.   Starting at the seam, we unpinned the first 4 inches of the fabric, one of us held the fabric out as the other sprayed.  Once the surface was evenly coated we smoothed the fabric down. and then re-pinned the tops and bottom to hold everything in place.  THEN we un-pinned the rest of the fabric and continued to work in about 4 inch sections.

STEP 6 - Finishing top and bottom - To avoid getting glue everywhere, we did not attempt to spray the glue the fabric to the top and bottom of the shade. Instead, once the face was dry (10-15 ms.) we used modpodge and a sponge brush to glue fabric to top and bottom, folding over appx 1/2" and working around the shade. This also let us have better control and make a nicer cleaner line on the inside of the shade.


Grab a book, sit back and relax by the light of your gorgeous new lamp shade!